Showing posts with label inchie arts llc.. Show all posts

Wednesday, September 15, 2010

twinchie transfers

Lisa Lee over at Inchie Arts asked me if this technique would work on twinchies
(that got me playing some more ;-)
are made from a high quality matte board
... they worked quite nicely in fact!
Thank you Lisa!


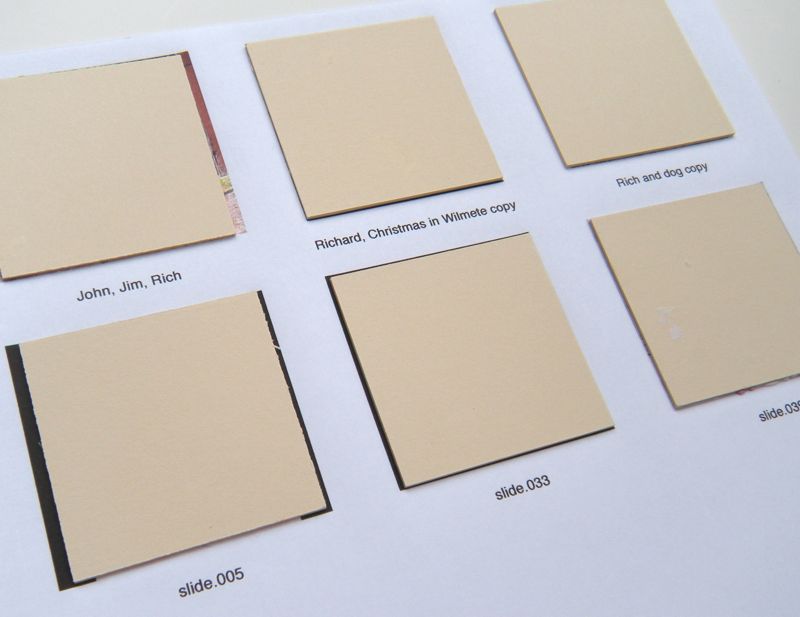
Here you can see that I've adhered my Twinchie Squares (dark cream) 
directly onto the images
I used Mod Podge - which is a decoupage medium
If you cannot obtain this, I would suggest Golden Acrylic Medium or white glue


Here they are individually cut out and fully dried
I allow at least half a day drying time
Next I simply wet the paper and gently rub it away leaving the ink jet image
(my original post about this process is HERE)


... and here they are all finished ...
The nice thing about using the Inchie Arts products for this project
was the sturdiness of the material
You definitely want to use something that will stand up to the abuse
(glue, water, rubbing, etc.)


this one is my fav
(these are all pictures of my dear old Dad)


Wednesday, May 26, 2010

p is for ......


this week's inchie is brought to you by the letter "p" and the challenge blog Inchy by Inch.
P is for ... plant
something everyone is quite busy with at this time of year

adhered a scrap of flowered paper;
decoupaged some pressed fern leaves;
glued poppy seeds to the edges;
added the word "plant;"
glued a dried hydrangea piece;
and then dipped the whole business in hot beeswax.

The Inchie Arts inchie square was the perfect thickness for the poppy seed edges. At first I thought of using beads, then I thought of glitter - but none of that seemed to fit with the natural colors. The poppy seeds are such a pretty faded purplish gray color. The way I did it was to first dip the edges of the inchie in white glue, and then dip the edges in poppy seeds. I used a generous amount of glue which dried beautifully and evenly without the matte board warping - and then dipping it in the hot beeswax insured that nothing will fall off. These archival quality matte board inchie squares can take a lot of "abuse" and still hold their shape :)

Thanks for looking! Have you tried making an inchie yet? (wink)

Wednesday, May 12, 2010

Butterfly Twinchie


Butterfly Twinchie
(This week's SCD Challenge)

***

here's the how-to:

1) Starting with an Inchie Arts Black Twinchie Square, either draw your image with a "Glaze" gel pen (made by Sakura), or stamp and emboss your image using clear embossing powder. I drew my own butterfly because I didn't have a stamp that would work for this.


2) Fill in your basic colors with oil pastel

3) Lightly buff the oil pastels off with a clean soft rag

4) Apply your background color and more color details in your image

5) Lightly buff again - repeat these steps as often as you'd like. Oil pastels have a lovely way of building up with layer upon layer of color.


I have always wanted to try oil pastels on a black background.  The color has a completely different depth to it than it would on white. The Inchie Arts high quality matte board bases are perfect for using oil pastels. The color applied evenly and I was able to layer and blend the colors without degrading the paper. The oil pastels have also sunk into the material and will not smudge off any more after the final buffing with the rag. There will be no need to add a fixative. Amazing.

Monday, May 3, 2010

"be objective"

this week's inchie is brought to you by the letter "o" and the challenge blog Inchy by Inch.
O is for ... be "objective"
sometimes that's pretty hard to do when life gets crazy
I like this image
 she looks very serene with her cup of tea
I think she took a break from the chaos
took some time to Be Objective
... ahhhh ...
sip
and
breathe.

***


One of my favorite embellishments for inchies is metallic gold thread. I love the look of the thread wrapped around an edge - or in this case all the edges. You can use a little or a lot.

For today's inchie, I started with an Inchie Arts Ivory Inchie Square. I applied some vintage graph paper (a gift from Patty), adhered a magazine image, some text, and then began wrapping the thread.


I glued the beginning edge of the thread to the back of the inchie. When the glue was dry, it was ready to wrap. The end was tucked under some of the wraps and glued as well. 

My final step was to dip the inchie in hot beeswax. I love the Inchie Arts Inchie Squares for this. Because they are a high quality matte board, the beeswax completely soaks in. What you end up with is a very clean, smooth, translucent collage piece where all the elements have become one in the beeswax.

.... here's a closer look so you can see what I mean. The Inchie Arts Inchie Squares are available in many local brick and mortar stores as well as online. For more info you can click HERE

Monday, March 15, 2010

"j" is for ...


This is for the Inchy by Inch weekly challenge.
I had a really hard time coming up with a word that starts with the letter J.
I've been trying to use words that are important to me personally.
I could have used "jump for joy"
but I'm not a jumping sort of person.
Or "just do it"
but that's reserved for athletes (I'm not an athlete by any stretch of the imagination).
Or "jazz it up"
but I don't like jazz much.
Or there's jive, jinx, jubilate, jeer, jiggle and jolly.
Ugh.
I kept going back to the idea of Justice.
This one works for me.
Just curious -
can you come up with a J word that's meaningful?

Also, here's how I made the nail heads in my inchie:


I just cut a straight pin with my "designated crummy scissors."
The Inchie Arts material is nice and thick to take my homemade nailheads.
I just create a hole using a large needle.
Then I add a dot of glue and insert the "nailhead"
The thickness of the Inchie base is great, because the homemade nailhead doesn't poke all the way through to the back.


Thursday, March 11, 2010

"bricolage" inchies


On monday I posted an inchie and Bleubeard and Elizabeth commented:

These insanely tiny pieces are beginning to call my name. Now if I could just figure out a way to make them bigger (grin). 

Well, I went over to her blog to see what she's been up to lately and I saw this post and I commented:

what a fabulous word (bricolage)! You could use this technique and then cut out a few one inch squares of the most interesting bits - and voila - you would have some amazing inchies (hint hint)

so I gave it a try.
As she said, Bricolage is:

Bricolage: (from Merriam-Webster)
Pronunciation: \ˌbrē-kō-ˈläzh, ˌbri-\
Function: noun
Etymology: French, from bricoler to putter about
Date: 1964
: construction (as of a sculpture or a structure of ideas) achieved by using whatever comes to hand; also : something constructed in this way
this is my full sheet of "bricolage."


then I cut it into 1" strips using a ruler and an x-acto knife


then I cut the strips into 1" squares, using a template and scissors


now just a few finishing touches with fibers, beads, sanding, etc.
and attaching it to a wonderfully thick, ivory colored inchie square
(another shameless plug for Inchie Arts and their fabulous art board bases)
and I'll have well over 100 inchies
why 100?
I'm in a 99 inchie swap
and no, I'm not crazy :)

Monday, March 8, 2010

"i" is for ....


I've tried to come up with words that haven't been overused in this type of art
(assemblages, alterations, etc.)
A typical choice would have been "imagine."
And, in my opinion, is overused.
When a word is overused, the meaning is diminished.
I like the word "invite."
The possibilities are endless - and very kind don't you think?


This inchie uses an Inchie Arts white inchie base, wrapping paper, watercolor paper, microbeads, pearl-ex powder, a brass charm with the hanger removed, and a krylon gold leafing pen.

This is my letter "i" for this week's Inchie by Inch challenge.

I "invite" you to try making an inchie
they're
inchie cinchie
easy peasy
especially when you start with an Inchie Arts base :)

Wednesday, March 3, 2010

spring blooms

("Hellebore" is also known as the Lenten Rose)

Here are 2 more of my flower twinchies.
(I'm creating a flower alphabet of the flowers growing in my garden)
Right now, the hellebores are blooming profusely ...
and the crocuses are carpeting lawns and flowerbeds all over town.


I just love this size!
- 2 inches square -
a "twinchie"
I'm using the white Twinchie Square bases from Inchie Arts.
The thickness and size of the thing just begs to be picked up and held in your hand
that's my kind of art format :)

Monday, February 22, 2010

Inchy by Inch: Letter G


They have an inchie/twinchie challenge every Monday.
Go check it out - maybe you'd like to play too!
Today, I thought I'd show you step by step how I make my illustrations.


I draw directly from a photo on my computer. This is a photo I used in a post on my Words on Paperscraps blog, titled "Saving Red." I was writing about my geraniums that I overwinter in the house every year. I've had the same geraniums for over 5 years now - they are like members of the family :)


Using my Inchie Arts Twinchie ( 2 inch) Square base, I sketch it out lightly in pencil first.


Then I go over the pencil lines with my micron pen. It's a .01


After I've erased all of the pencil lines, I can paint in the colors. The Inchie Arts paperboard material takes the erasing without ruining the surface of the paper. That's important with watercolors. The watercolors I use are a traveling paint kit from Windsor Newton. They have all of the basic colors and it packs up neat and clean when I'm all done.


(you can click on any of the photos to get a larger view)


Thanks for all of your sweet comments on last week's Fuschia (oops) Fuchsia! I'm hoping to make it all the way through the alphabet with flowers from my garden - all of them grown by my sweet husband. He's got the real green thumb! If mine happens to be green, it's probably ink or paint or something like that!

Saturday, February 20, 2010

inspiration from a blogger friend


Patty (her blog is Magpie's Nest) was showing us her zentangle atc's last week.
She said she was doodling her way through the Olympics.
I was inspired to do the same!
I used Inchie Arts black inchie squares and my silver Signo gel pen.
The linework is kind of broad, but oh so smooth :)
Thank you Patty for the inspiration!


Monday, February 15, 2010

Inchy By Inch Challenge

Having all this fun stuff to play with from Inchie Arts has got me jumping in on the Inchy By Inch Monday challenges. They're going through the alphabet and are on the letter "F" now ... I think I have some catching up to do! For this project I used the white Twinchie Squares (shown here .....)

I think I'll go through the alphabet using flowers from my garden.
I have beautiful baskets of fuchsias on my porch in the summertime.

Using a photograph from last summer, I first sketched my drawing in pencil and then went over it in ink and next colored it in with watercolors.
The Inchie Arts material took erasing of the pencil marks without the surface getting roughed up -
and I'm very happy with how well the watercolor took to the surface as well.
***
But did you know how to spell F U C H S I A?
I didn't! and had to put in an "oops!" and spell it correctly ...
I can't stand to leave something misspelled!

You'd think it would go by typical spelling rules - is there such a thing? - and be spelled 
F U S C H I A
 .... but it's named after a 16th c. German botanist by the name of Leonhart Fuchs .... so it's 
F U C H S I A
 .... oops!


Monday, February 8, 2010

Beeswax Final (.... and an announcement)

I'm thrilled to announce that I'm a new member on the design team for this company: inchie arts, llc.
I've loved their product since receiving a box of Inchie Squares from a dear friend as a birthday gift last year.
It's a thick, high quality, acid free, archival material that is extremely useful in the making of "inchies" (1 inch square), "inchies +" (1.5 inch square) and "twinchies" (2 inch square).
I was happy with cereal box cardboard until I started using these.
There really is no comparison.
They take the glue, the inks, the watercolors, the collage, the beeswax - beautifully.
They give your inchies that special heavy feeling that makes you want to hold them in your hand and drop them on the table like poker chips. That might sound kinda weird - but it's a very tactile thing to hold a handful of inchies.

As you know, I've been playing with beeswax for the last 2 weeks ....
I also received materials from inchie arts to "play" with at about the same time.
So, I'm wrapping up my beeswax tutorial with these two twinchies.
I used the "Twinchie Squares" in white.

In these examples I used:

oil pastel

and collage.
In the oil pastel example, I really worked the pigment into the twinchie square base. I used several layers of color. Rubbing in, rubbing off, rubbing in some more, scratching off. If you haven't tried oil pastels and you're the sort of person who used to love finger painting as a kid, this medium is definitely for you. It's very hands on, can get pretty messy, but is very satisfying for creating your own colors and depths of color. You definitely need to apply some type of coating to oil pastel though. It will continue to rub off every time you touch it if you don't. I used beeswax, but an acrylic medium also works great.
The thing with using beeswax on oil pastel is that some of the oil pastel will melt and swirl around in the beeswax - giving it a softening effect. So just be careful - and know that you'll lose some definition in the heat of the wax.

For the collage example, I wanted to follow the same image I had done in the oil pastel. I thought it would be fun to see the differences. I used only torn or cut paper from a magazine. The magazine paper is sometimes tricky to glue down because of it's slick coating, but it stuck perfectly well to the twinchie square base. I think in the past I've had trouble because cereal box cardboard has a slick surface as well. I used to sand it as prep, but even that would still sometimes fail and everything would peel up later.
I dipped this in beeswax as well - which I just LOVE with collage. It really gives the layers of paper a depth and transluscence that I love. I applied the krylon pen edging after the fact, because it will dissolve completely off in the hot beeswax.

Thanks for hanging out with me through almost 2 weeks of beeswax!!!
It's been so much fun ....
I think we all wish we could get together now for a beeswax fondue party
.... at my house!
Now THAT would be fun!